NARUTO DRAWING - HOW TO DO IT IN EASY 6 STEPS: There are many characters in the history of manga and anime that have become beloved figures around the world. Of all these characters, Naruto Uzumaki is one of the most popular. He is the star of various manga and anime adaptations, and he is a young and enthusiastic ninja in training.
He is surrounded by other iconic characters as well, and he goes through many amazing adventures. With so many fans around the world, it’s understandable that many of them would like to know how to draw Naruto. Anime and manga characters are usually quite detailed, and Naruto is no exception.
This can make learning how to draw him difficult, and that’s why we wanted to make this guide. In six steps, we will show you how to draw and color this famous character so that you can make some of your own fan art of the character.
Once we have covered how you can draw him, we will also go over a few ways that you can take it even further with your own ideas and additions. So prepare to go on an amazing journey with Naruto as we begin this guide and show you exactly how it can be done.
Step 1
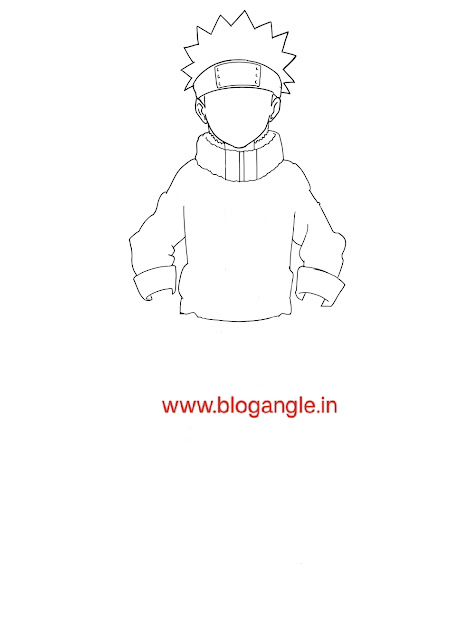
NARUTO DRAWING - HOW TO DO IT IN EASY 6 STEPS: We’re going to take it from the top for this drawing, quite literally! We will begin with the head and hair of Naruto in this first step. Whenever you’re drawing people, even in an anime style, it can be helpful to map out the drawing with a pencil first. This is helpful as it helps you to keep the proportions looking accurate.
We would certainly recommend doing it for this drawing as well! You can start by drawing a rough oval shape for the head. Then you can use larger ovals for his body and limbs, using the later images to help you out. Whether or not you decide to do this trick is up to you, but it will help if you do!
Regardless, we are ready to draw his head now. The shape of his head is fairly rounded and not that exaggerated compared to a real person’s face. Remember to also add his ears on the side of his head, and then add some simple details inside them. Naruto wears his signature headband, and we can add that as well.
Simply draw some curved horizontal lines to create this headband above his ears and across his forehead. Finally, you can finish off this step by drawing his hair. Like many manga and anime characters, he has a really spiky hairstyle. It should be fairly easy to draw, as it is merely a series of spiky shapes connecting to one another. That does it for his head and hair, and we can move on to step 2.
Step 2: Draw some more details and his torso
NARUTO DRAWING - HOW TO DO IT IN EASY 6 STEPS: We will be adding quite a lot in this second step, so let’s go slowly with this one. First of all, there is a rectangular badge on his headband, so we will add that. It is quite large at the center of the headband, and it has six small circle shapes on the left and right sides. Next, we will draw the collar for Naruto’s uniform.
His collar is quite large and distinctive, but it shouldn’t be too difficult to draw if you follow the reference closely. When drawing it, we will be using a slightly bumpy line to make it look a bit fluffy.
There will also be two vertical rectangle shapes at the front of his collar to show where the opening is. The next part we will draw will be the sleeves of his jacket. When drawing this section, bear in mind that his hands will be at his hips, so try to position the sleeves of his jacket in the same way that we did in our example.
We will be using some curved, bumpy lines to replicate the look of bunched up material. To make it look like his sleeves have been rolled up, we will add some rectangular shapes to the ends of the sleeves.
The arms themselves will emerge from these shapes later on in the guide. For now, we can finish off this step by drawing his chest. His chest should be fairly simple to draw, and it will be its own section. Once again, we won’t be using completely straight lines to make it look like he’s wearing fabric. Now, it’s time to move on to step 3!
Step 3: Add facial features and hands for Naruto
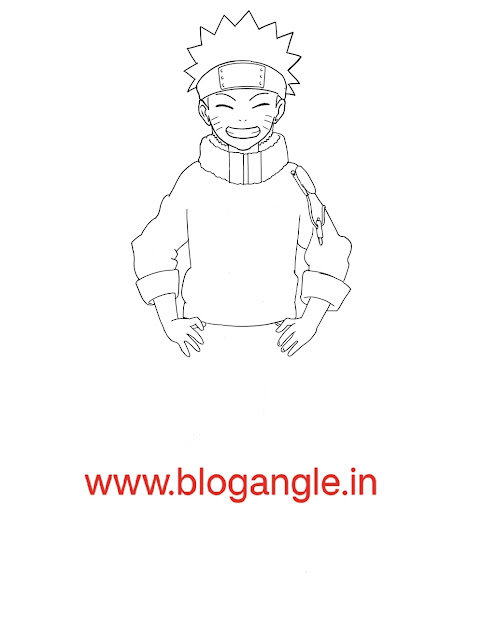
This step will be focused on adding some facial features and the hands for your drawing of Naruto. Let’s start with the face. We have quite a charming facial expression for Naruto in this design, and while it may look complicated it is actually made up of some fairly simple lines.
His closed eyes can be drawn using some simple curved horizontal lines. They will then have his eyebrows above them which look very similar but are a little thinner than the lines for his eyes.
You can then draw his nose using two small dots for his nostrils. His mouth is also drawn as a fairly simple curved shape, and there will be two small horizontal lines on each side. Finally, finish off his face with three simple lines on each of his cheeks. Next up, we will draw the accessory on the shoulder on the right.
This has a small rounded section with some fiddlier wires coming down from it. We would recommend copying this accessory closely from our example image. Finally, we will draw his forearms and his hands. Drawing hands can be tricky no matter which style you’re drawing in, so once again we would recommend following the reference image closely.
As we mentioned earlier, they will go on his hips to create this pose. That’s all there is to it for now, and we can head to step 4.
Step 4: Now draw some more details for his top
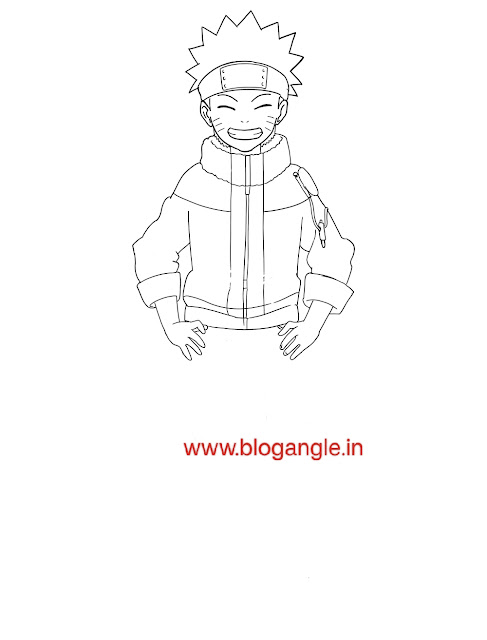
Before we move on to drawing his legs, we have a few more details to add to his top. This won’t be anything too intensive or hard to draw, and it will just finish off everything nicely for this section of the character.
First, we will be extending those two rectangular sections that you drew on his collar previously. These will extend all the way down until his belt section. They will be drawn using some smooth vertical lines with the slightest of curves. They will also be connected with some small lines between them, as shown in the reference.
Right above the belt, we will add a wavy line to show the crease in the fabric. Next, draw some horizontal, slightly curved lines underneath his shoulders and connect to the separation we just drew at the center of his torso.
The final thing to draw for this step is his belt. This is a pretty simple detail to draw, and it will finish off this section nicely. Simply draw another slightly curving horizontal line above the start of his waist, and then add a little vertical line at the center of this section.
That’s really all there is to it for the top half of his body! Before we move on, make sure that everything is looking as you want it and then we can add the final details.
Step 5: Draw his legs and some final details
NARUTO DRAWING - HOW TO DO IT IN EASY 6 STEPS: Now we’re ready to add the final details to your Naruto drawing. There is a lot to add in this step, so this is one where you should definitely pay close attention to the reference image.
First, we will draw the outline of his pants, using some more curving lines. The cuffs of his pants are rolled up, and the ends will be drawn as some rounded rectangular sections.
Then, there will be some simple straight lines for what is showing of his ankles, and the final aspect will be his sandals. With all the elements added, we are ready to finish off the finer details.
There are some lines drawn across his leg on the left, with a small pouch attached to it. Now, we will head back to the top and draw the symbol on the badge of his headband. Next, you can draw some small texture details on his large collar. There will be some simple details added pretty much everywhere on the drawing in order to create some more texture and realism.
You can copy the details we show in our image, but feel free to add any of your own as well! When your drawing is complete, you can also take it even further by adding other elements. One great way to do this is by adding a background or even other characters in order to recreate your favorite Naruto scenes. It’s all up to you now!
When you’re happy with how it looks, you can erase any pencil lines you used to plan out the drawing and we will add some color in the final step.
Step 6: Now, finish off with some color for Naruto
NARUTO DRAWING - HOW TO DO IT IN EASY 6 STEPS: Naruto is a character with plenty of bright colors in his design, but there are some darker colors mixed in as well. It makes him a pretty distinctive character, so we will go over all of the colors included.
First, you can use a bright yellow to color in his hair. Don’t forget to color the small sections of hair showing at the bottom of his head. Next, we will be using a dark blue color for the headband and the shoulder pads. His boots and belt will also use this dark blue color.
Then, we will use a light flesh tone for all of his exposed skin and then some grey for metallic elements such as his headband badge and the zip of his uniform. The final element will be the bright orange of his uniform which will finish off his whole look. When bringing color to your drawing, you can play around with different art tools and mediums.
If you want to make it look like a classic anime style, you could use some watercolor or acrylic paints to give it a more painterly look. Colored pens and markers can be used if you want the colors to be nice and bright. Having a mixture of different mediums can also help to make it look even more dynamic.
Don’t forget to color any background details or extra elements that you added! Naruto is such a classic character that is beloved the world over, so we hope that you enjoyed learning how to draw him!
Anime characters are quite tricky to draw, so that’s why we wanted to break it down into smaller elements. Now that you have learned how to draw Naruto, you can try out different facial expressions, poses and scenes to create your own unique artwork.
There are so many different characters in the Naruto universe, so feel free to add all of your favorites as well! This guide is a starting off point, and now you can take it even further. It could even be fun to create a crossover and add some of your other favorite anime characters with Naruto for something really cool and special!
Whatever you decide to do, we know that we would love to see it. When your artwork is complete, you can show off your hard work by sharing it on our Facebook and Pinterest pages. It would be amazing to see how it turned out!


0 Comments